 A Guide to Creating Your Own Neoboard Block Font
by preksolanx
--------
Picture this scenario. You’ve just finished a long day of completing jobs at the Faerieland Employment Agency and are relaxing at home, sipping away at your favourite Borovan Bubble Tea. Eager to catch up with your beloved friends on the Neoboards, you hop onto the Pound Chat to see who’s online while reading up on the latest happenings that day. You click on the last-posted board, and there she is again – that user with the beautiful pink Kadoatie block font. You’ve always found that it pairs so well with her Kadoatery - Mew! avatar and her adorable Baby Aisha. “If only I knew how to make cool block fonts like that,” you sheepishly think to yourself, brushing away the slight tinge of jealousy you feel after seeing her cute font. Sound familiar? Well, today might just be your lucky day! The purpose of this article is to provide a comprehensive beginner’s guide to creating your very own block font. Best of all, there is a step-by-step example to go with the guide, so feel free to follow along as you read! Contrary to popular belief, block fonts are not extremely difficult to create. That said, they can be slightly tricky to get right sometimes, especially for beginners. Before we get into the nitty-gritty details of the guide, here are the essential HTML and font-related stuff you need to know. “[font][/font]” – this tag manipulates your font - you can vary the type, size, and colour of your font. Although it is not essential, I highly recommend using the Courier or Monospace font when implementing your block font. “[center][/center]” – this tag centralizes your text. “[br]” – this tag serves as a line break, which simply means that your text after “[br]” is on the next line. “[p]” – this tag serves as two line breaks. These are the HTML tags which will be used in this guide. There are other tags such as [i][/i] (i.e., italicize) and [b][/b] (i.e., bolden) which can be used to modify your text, but I will not be using those in this guide. “ “ – character also known as “alt space” in this guide, hold the alt key and type “255” on your numpad. NOT the same character you get when you hit the space bar. “▄” – character also known as “lower half” block in this guide, holt the alt key and type “220” on your numpad, or simply copy and paste from here. “▀” – character also known as “upper half” block in this guide, hold the alt key and type “223” on your numpad, or simply copy and paste from here. “█” – character also known as “full” block in this guide, hold the alt key and type “219” on your numpad, or simply copy and paste from here. These are the four very important characters you need to build your block font! You will see a lot more of these as we move along. Very importantly, “ “ is not the character obtained from hitting the space-bar, but it is the character you get when you hold the “alt” key and hit “255” on your numpad. I refer to this character as “alt space” in this guide. There are more characters that people use to create gradient or shading in the font, but I will not touch on those here. Phew! With that out of the way, let’s dive right into the guide. In general, these are the 3 steps I tend to follow when making a block font. Step 1: Deciding the design of the block font. Step 2: Converting the design of the block font into text. Step 3: Converting the text into NeoHTML & NeoSignature. We’ll go through these steps in detail with an example to follow along, and by the end, you should hopefully get a more thorough understanding of how to create your own block font. Step 1: Deciding the design of the block font. This is by far the longest and most difficult step in the entire process. This is mainly because block fonts fall into the realm of simple pixel art, and if you’ve never created pixel art of your own, it can be difficult to come up with a pretty design by yourself. However, there are several ways to tackle this so that you may get started. For example, you can always take inspiration – AND NOT STEAL – from the vast quantity of pixel art available online. For example, I personally like Delfins, and I think a Delfin-inspired block font would be really nice to have. Thus, I might find it beneficial to search for pixel art closely related to Delfins (preferably simple ones because of limited characters to on the NeoHTML and NeoSignature) and see where I can go from there. Suppose I have found one to take inspiration from. Now, what I would need to do is put my own take on a Delfin on an empty pixel art canvas. A pixel art canvas is simply a rectangular drawing board consisting of pixels. There are many pixel art canvas tools available online, and using one is essential in beginning Step 2 later on. Remember, you need to convert the blocks (or pixels) into text later on – the ultimate goal is a font to use, so you can’t use any old drawing canvas like MS Paint!  This is my take on a Delfin on a pixel art canvas. If you’re good at potato counting, you should be able to tell that it is on a 16 pixel by 16 pixel drawing board. Do you see why it is important to use such a specific type of canvas now? We will be using the four specific characters mentioned earlier to convert this pixel art of a Delfin into text! Step 2: Converting the design of the block font into text. This step is way easier than the first once you get the hang of it. After you’ve decided on your design and it is on your canvas, divide it into row-pairs. Since my Delfin is on a 16x16 canvas, there will be 8 row-pairs. I’ve highlighted each of them in a different colour below. 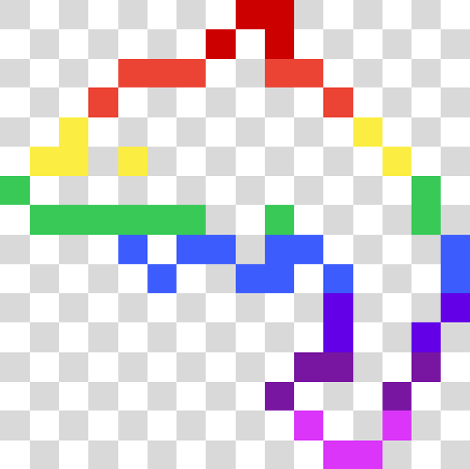 Now, this is where most of the magic is – each row-pair can be represented by a combination of the four important characters described above. Here’s how (by the way, now is a good time to open up your Notepad). Let’s look at the first row-pair in red.  If we were to consider this row-pair from the perspective of a line of text, we can see that there are seven “alt spaces”, followed by a “lower-half” block, an “upper-half” block, a “full” block, and six “alt spaces”. Specifically, we can represent this row-pair as a line of text consisting of seven instances of “ “, followed by an instance of “▄”, followed by an instance of “▀”, followed by an instance of “█”, followed by six instances of “ “. In Courier font text, which is very conveniently the default font of your Notepad, this is represented exactly as:  Try it out – put the characters into your Notepad! If you can’t see it just yet, let’s repeat the same process for the second row-pair in orange. It consists of three instances of “ “, followed by an instance of “▄”, followed by three instances of “▀”, followed by two instances of “ “, followed by two instances of “▀”, followed by an instance of “▄”, followed by four instances of “ “. Combined with the first row-pair, this is represented exactly as: 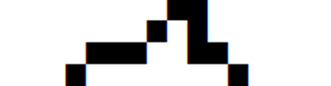 Clearer now? Good! Repeat this for all the other row-pairs and in combination, you get: 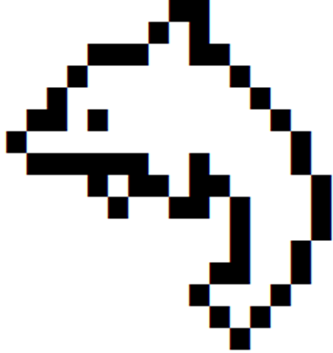 Tada! Our Delfin is now in text format, and that’s pretty much it for this step! Note that it is fine to have a canvas with an odd number of rows, just add an empty row at the end of your canvas so that you can split your block font into proper row-pairs. The conversion method works exactly the same. Now all we have to do is put our text Delfin into NeoHTML and NeoSignature! Step 3: Converting the text into NeoHTML & NeoSignature. You’re almost there, hope you’re not feeling too overwhelmed just yet! Now that I’ve got the Delfin in text format, suppose I want a very simple font to use that goes with it, something like this: 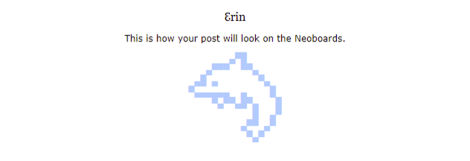 Pretty rustic, but that’ll do for me. Let’s go through step-by-step how to get this font up and ready to use. Firstly, we’ll get the simple, non-block font related stuff sorted out. Notice that everything is centralized, and my name is in black Georgia font, size 3. The “[“ at the end of NeoHTML and “]” at the start of NeoSignature removes the ugly hyphenated lines in posts, so with NeoHTML: [center][fontf=georgiac=#0s=3]ℇrin[/font][p]neoHTML[ NeoSignature: ][/center] We get:  Secondly, now comes the exciting part of putting in the Delfin. Let’s put in the first three row-pairs as an example. We use [p] after neoHTML so that we can immediately start the block text after. I want the block text to be in the colour #acf with size 2, and I’ll use the Courier font as I suggested earlier. We need exactly one line break in between each row-pair as well. Since we’ve done Step 2, we know that ” ▄▀█ “ represents the first row-pair, “ ▄▀▀▀ ▀▀▄ ” represents the second row-pair, and “ ▄█ ▄ ▀▄ “ represents the third row-pair. Now, the information in this paragraph is very important to note when implementing your block fonts. If your font is centralized, then given a row-pair, you can remove an equivalent number of continuous extra “alt spaces” from both the left and right of that row-pair. This is not important when you have enough character space to work with, but if you need those extra precious characters in your NeoHTML and NeoSignature (like in this example), then this fact is crucial. In the first row-pair, there are seven continuous “alt spaces” on the left and six continuous “alt spaces” on the right. Thus, I can remove a total of twelve “alt spaces”, six each on the left and right, and the text will turn out the same at the end. In other words, the first row-pair can be represented as “ ▄▀█” instead of ” ▄▀█ “. Repeat this for the second and third row-pairs and you will see that you can represent them as “▄▀▀▀ ▀▀▄ “ and “▄█ ▄ ▀▄ “ respectively. So now we have: NeoHTML: [center][fontf=georgiac=#0s=3]ℇrin[/font][p]neoHTML[p][fontf=courierc=#acfs=2] ▄▀█[br]▄▀▀▀ ▀▀▄ [br]▄█ ▄ ▀▄ [br][ NeoSignature: ][/font][/center] Which yields:  We have 119 characters in the NeoHTML at this point, so all the remaining Delfin text should be added to the NeoSignature. Putting in all the remaining row-pairs there, we get: NeoHTML: [center][fontf=georgiac=#0s=3]ℇrin[/font][p]neoHTML[p][fontf=courierc=#acfs=2] ▄▀█[br]▄▀▀▀ ▀▀▄ [br]▄█ ▄ ▀▄ [br][ NeoSignature: ]▀▄▄▄▄▄▄ ▄ █ [br] ▀▄▀▀▄█▀▄ █[br] █ ▄▀[br] ▄▀▀ ▄▀[br] ▀▄▀[/font][/center] Which yields our final goal: 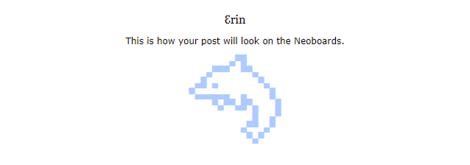 Wow!! The completed font is now ready to use! And that’s basically it for the three steps! Again, note that it is crucial that you ensure all the spaces in your block font are not the space character you obtain from hitting the space bar, but the “alt space” character you obtain when you hold the alt key and type “255” on your numpad. I’ve typed the NeoHTML and NeoSignature to help you get a rough idea of what both those fields should look like when implementing block font. However, if you copy and paste it character for character, from my experience, your “alt space” may change to a standard space bar space, ruining the font. Before I end the guide, here are some final tips I have for you. Tip 1: Buy a Neoboard pen! With a Neoboard pen, you not only get to post with multiple avatars on the boards more conveniently, but you can also type more characters in your posts, NeoHTML and NeoSignature! Having a Neoboard pen is perfect for creating more intricate and beautiful block fonts, and it certainly makes life a lot easier when you’re trying to fit in your font to the character limit. Tip 2: When putting your row-pairs into your font, the entirety of each row-pair need not be exclusively in either the NeoHTML or NeoSignature. You can split it up – the first half of the row-pair in the NeoHTML and the second half in the NeoSignature. This can come in very handy when you need to save character space. This goes for any text, in general, you may want to put in your font. However, the HTML tags (i.e., “[/font]”, “[br]”, and so on) must always be respected, these can’t be split. Tip 3: This is not the only way to create block fonts. As I mentioned, the Courier and Monospace fonts are recommended by me and are the backbone for this method of creating block fonts. However, they are not essential. Courier and Monospace fonts have the nice property of being monospaced (i.e., every character takes up the same amount of space in text), so they are perfect for beginners to use for block fonts without needing to consider the aspect of character space. Experiment on your own, you may find a unique way of making your own block fonts! Tip 4: It has already been implied in the guide, but colour codes can be described in three characters instead of six. This is important when you need to cut characters, but it comes at the small cost of making your colour slightly less specific. Remove the second, fourth, and sixth characters in a six-character colour code to get the three-character code of that colour. Shoutouts and shoutouts to Aya, an amazing font creator, from whom I learned this awesome tip. Tip 5: If you have the time, practise! Creating block fonts may not be the easiest thing to do, but it can be very fun and gives you the opportunity to showcase your unique flair in your posts. And that’s all from me! I hope this guide has given you a much better understanding in creating block fonts. Until next time! ^^ With Love from Erin (preksolanx), Katelyn (corrina404) and Nick (theguy2020).
|