|
The Return of Dr. Sloth - Puzzle Solutions We had a lot of fun designing the fiendishly difficult puzzles in this plot, but y'all stepped up to the challenge! Good work! - Puzzle 1: A Series of Tubes - Puzzle 2: Breaking the Code - Puzzle 3: Shuttle Bay Rescue - Puzzle 4: 652,491,337 Tokens The day after the first comic was released, a mysterious unlabeled door appeared at the bottom of the Space Station map page: 
This door led to the Maintenance Section, a short hallway with several more doors. One of the doors was open (and a clickable link): 
This door took the player to the Series of Tubes puzzle, in which they had to guide Gorix through the maintenance tunnels in the station in order to make his way, undetected, to Grundo's Cafe, in order to meet up with the Cybunny Scout. The puzzle consisted of five levels; to complete a level, players had to manipulate the environment in order to cause Gorix to make his way to the exit. Each level featured a number of pressure doors, and the exit door would only open once all the pressure doors were closed. Each pressure door would close once Gorix (or, in later levels, a Buzzler) passed through it. Gorix would walk in a straight line until he hit a dead end or a flat wall (in a T-intersection), at which point he would turn around. He would follow corners and bounce off any doors that were already closed. Airlocks would cause Gorix to tumble out into space, at which point the player would start that level over; and any contact with a Buzzler would injure Gorix and again cause him to have to start the level over. Passing through one of the rotating rooms would cause Gorix to exit the room in the direction the arrow was pointing (the rooms contained gravity generators that redirected Gorix), and then rotate the turntable by ninety degrees. The first level was relatively straightforward. No buzzlers, one airlock, one door, and one turntable. Rotating the turntable into the down position would solve this one easily. 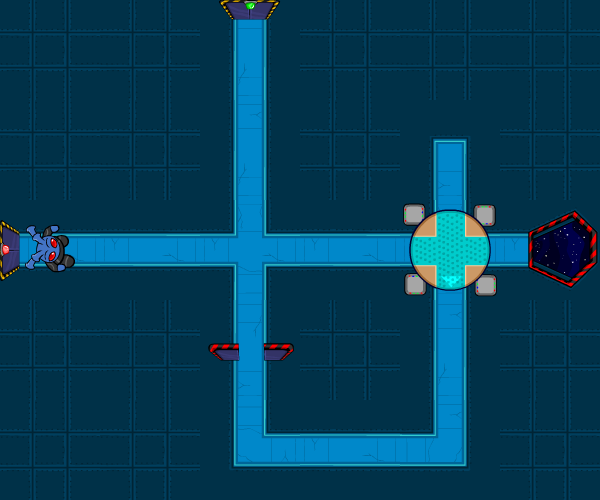
The second level added one Buzzler, three more doors, and four more turntables. Still not all that complex, but a little tricky. The first turntable had to point left, which would cause Gorix to bounce back once before continuing around -- any other orientation would cause him to collide with the Buzzler. The right half of the level had multiple possible solutions. One of the most commonly used solutions was as below: 
However, the following solution (the one we initially developed) was about three seconds faster: 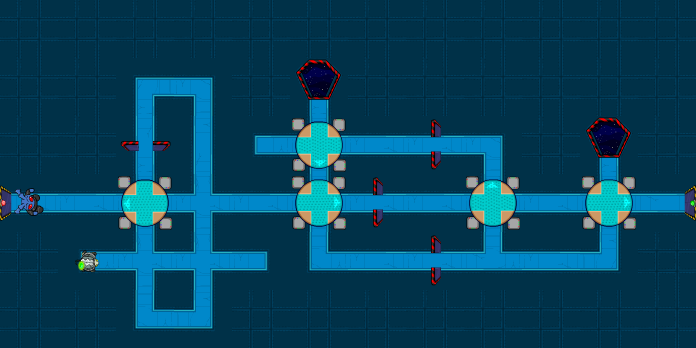
The third level had several Buzzlers. Again there were multiple solutions, but here's ours: 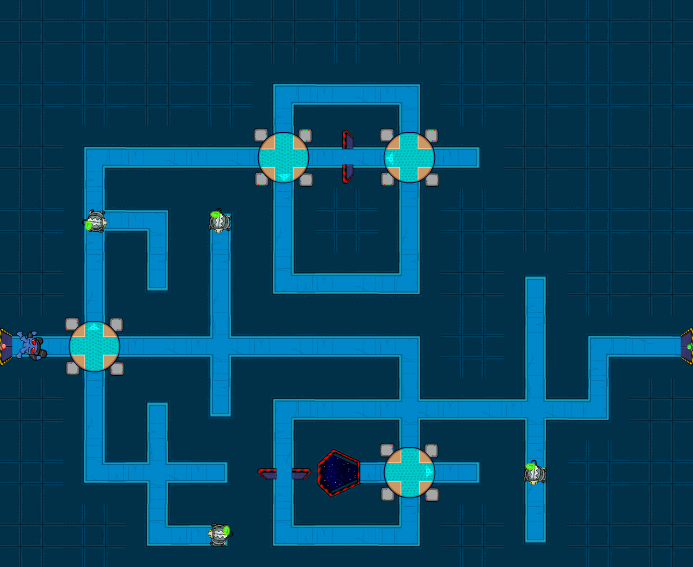
The fourth level, again, had multiple solutions, although they frequently depended on split-second timing to avoid the four Buzzlers in such a confined space: 
The fifth and final level looked intimidating to start, but actually had several rather simple solutions. This was the only level in which Buzzlers would close the pressure doors, and Gorix merely had to avoid colliding with them. As always, there were multiple solutions, though some were faster than others. 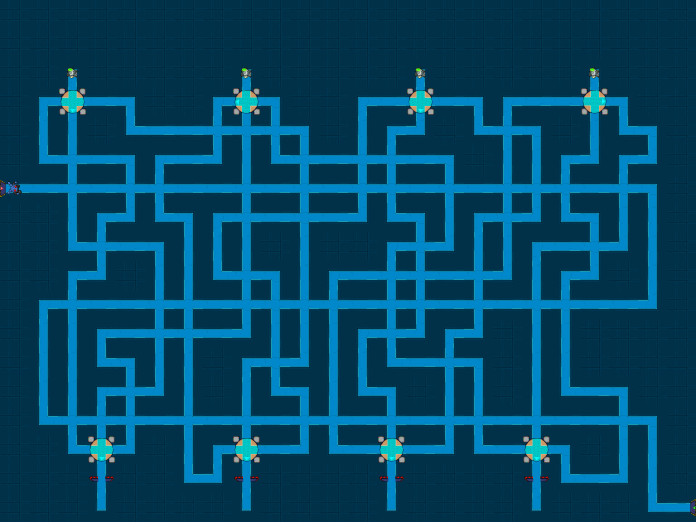
This puzzle was fiendishly difficult when compared to the first. A number of strategies were developed for solving it, but here we'll present the mathematical underpinnings of the whole system. When the second puzzle became active, another door would open in the Maintenance Section, if you had completed all five of the Tubes mazes. 
This new door led to Resistance Headquarters, in which the players would find a computer terminal: 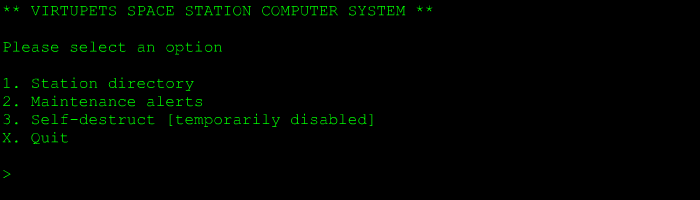
Choosing any option would give a humorous error message. However, entering "4" would bring the player to an "administrative" menu, in which option "2" would bring the player to a screen that looked like this: 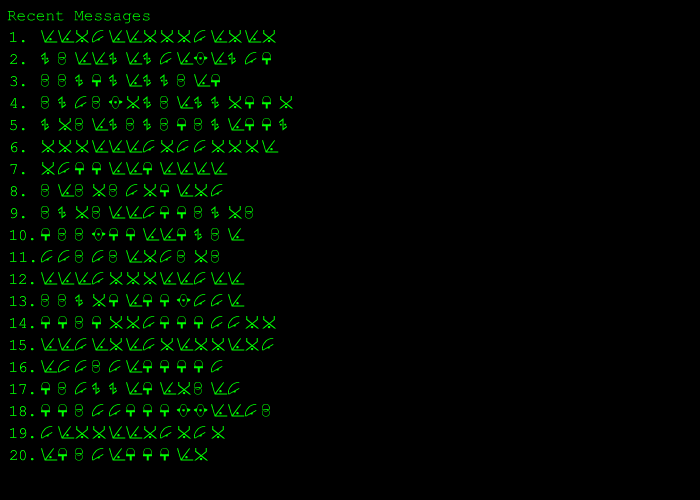
This was a list of recent "messages" sent over the Virupets Space Station's communications network. Each player saw twenty messages, each of which had a random series of symbols as its title. The symbols were based on nine of the basic codestone symbols:
Only seven of the symbols were actually used in the puzzle (however, due to an occasional glitch, the other two would appear occasionally). (Originally we were going to make the last set of messages use all ten symbols, so count your blessings.) The twenty messages were divided into four groups: 1. Space Weather Reports, 2. Civilian Traffic, 3. Maintenance Reports, and 4. Military Comms. Each group was encrypted with the same strength encryption scheme. Once a player clicked on a message title, they would be taken to a screen that looked like this: 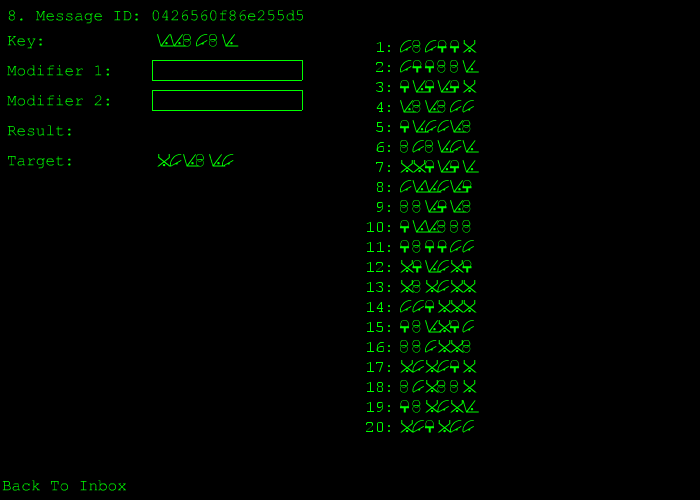
The list of symbols on the right were the pool of modifiers that could be used to try to crack that code. Once all the modifier boxes were filled with modifiers, the system would return the result of combining the key and the modifiers. If the result matched the target, the message would be decrypted. 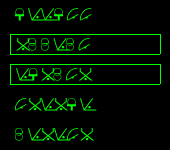
In the above example, since the result does not match the target, the message is not decrypted. The result was calculated by combining the key and each modifier, one symbol position at a time. In the above example, the key's first symbol is the one based on the Main codestone, but we just called it P. This symbol was combined with the first symbol of each modifier, in this case X and V to produce C. So why did those symbols create that result? Internally, each of the symbols corresponded to a number between 1 and (in this example) 5. Combining two numbers together was as simple as taking the first number, and then moving along the following cycle a number of spots equal to the second number: ... 5 > 1 > 2 > 3 > 4 > 5 > 1 ... So, in this case, P = 5, X = 1, V = 2, and C = 3. In the above chart (which cycles around from 5 to 1), if we start at 5 and move 1 space, we get back to 1. 2 more spaces and we get to 3. So how were players supposed to figure out which of the many possible combinations of modifiers would create the intended result? In the above example, there are 20 modifiers to choose from, and 2 slots; each modifier can only be used in one slot at a time, so this created 20 * 19 possible combinations (there are 20 choices for the first slot; once you have used up one choice, there are 19 modifiers left to choose from for the second slot), or 380 combinations. One way to solve this particular message would be to brute-force it; that is, try all possible combinations. 380 combinations would only take a few minutes to try. However, this was only the second level of encryption (Civilian Traffic). The Maintenance Reports and Military Comms messages each had 3 modifier slots, and a pool of 30 modifiers to choose from, for a total of 30 * 29 * 28 = 24,360 combinations per message (and each message had its own random set of modifiers)! Moreover, the higher-level encryption used a larger number of symbols as well. Therefore a shortcut was needed. Let's go back to the number cycle described above. One important thing for each player to determine was the mapping between the symbols and numbers. The simplest way to do this was to try combining a key symbol with the same symbol or symbols in the modifiers. This could be repeated for each symbol until the mappings for all symbols were discovered. For example, in the easiest rank of messages (Space Weather Reports), combining C with itself might result in another C. Since in the easiest rank, the code numbers are 1, 2, and 3, C must be one of those three numbers. Using a number cycle as above from 1 to 3: ... 3 > 1 > 2 > 3 > 1 ... ...we see that 1 and 1 makes 2, 2 and 2 makes 1, and 3 and 3 makes 3. Therefore, C must be 3. This leaves the other two basic symbols, V and X. Testing would show that V + V produces X, and X + X = V. There's no way to tell which one is 1 and which one is 2, but mathematically, it doesn't matter; it's just two paths to the same place. The same tests can be performed with the higher-level encryption to map all seven of the symbols that were used:
Once the mappings are known, it's a simple (although tedious) task to figure out what combinations will get from the source to the destination. In the earlier example, the first key symbol is P, and the target is B. Numerically, this means we want to get from 5 to 4. With two modifiers, and a 5-symbol cycle, there are three ways to do this:
That's 37 possible pairs, not too many to try one-by-one to brute force. However in the higher difficulties, there might be hundreds of combinations, which would still be too many to do by hand. But we can narrow down the pool by looking at the second position in the key and target. In this case, we want to get from V to V. Again, there't three ways to do that:
This brings us down to 9 combinations, a much more manageable number. At this point a player would probably choose to try all nine remaining combinations, although the process of position-by-position elimination can continue until the correct pair is found. The principle is the same even for the more difficult levels of encryption, however the number of possible combinations grew fairly large, making this a very difficult step. This step was, by contrast, much easier. A third door opened in the maintenance tunnels for those who had completed puzzle 2, and it let to the shuttle bay, where Cylara and her friends attempted to rescue Cylara's parents and the Cybunny, Scout, from the Garoo Elite who were guarding them in a cargo transport: 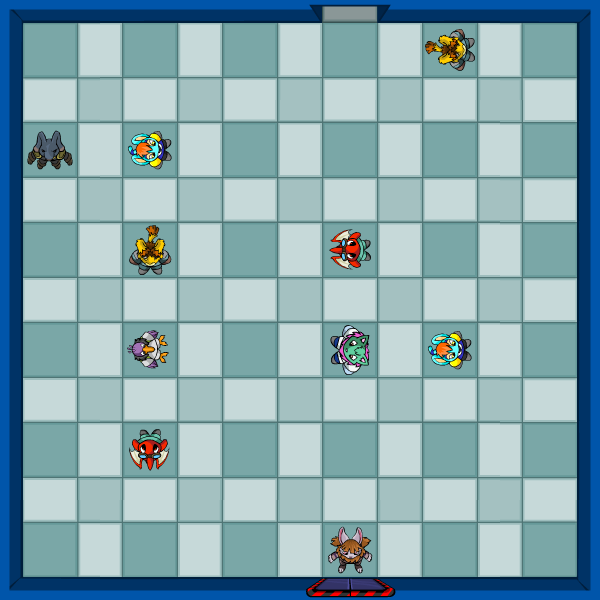
Cylara, starting at the bottom, had to make her way, one space at a time, to the exit, while avoiding or incapacitating the Garoo Elite patrolling the bays. The civilians, terrified, remained stock-still the entire time. Every time Cylara took a step (she was limited to moving left, right, up, or down) all the Garoo Elite in the bay would also move a step. They could move forward, turn left or right, turn around, or sometimes, do nothing at all. If the player ever moved Cylara into direct line of sight of one of the Garoo Elites (that is, on the same row or column as the Garoo Elite, and with the Garoo Elite facing Cylara), they would immediately sound the alarm and capture her. However, if Cylara managed to approach a Garoo Elite from the side and walk onto him, she would knock him unconscious and he would be removed from the rest of the level. Since the Garoo Elites moved randomly, there was no set pattern or answer for how to pass each puzzle; it simply took some trial and error. On the fifth level, there was no exit door; Cylara's goal was to reach her family and Scout in the upper-left corner of the map. The last puzzle was accessed via an image of Gorix's spaceship on the Kreludor map: 
Clicking on it led to Sloth's ship, and specifically to a token testing facility where it was revealed that Dr. Sloth had mass-produced millions of duplicates of the Space Faerie's token, so that he could equip his legions with the powers of the Space Faerie. However, his experiments had been a failure, and he had not been able to duplicate the powers of the token even though he could duplicate the token itself. This left him with more than 652 million unusable Space Faerie Tokens. The whole facility was monitored by Yurbot, a Yurble-shaped robot who bore an oddly angry resemblance to Yurbles of plots past...
Cylara and Gorix guessed that one of these tokens might be the real one, and so set about trying to find it. The process involved exposing each duplicate token to a series of tests, designed to see whether each token would demonstrate the true powers of the Space Faerie. The three tests were:
Making Control Rods When starting this activity, players were presented with a selection of pieces of scrap metal. They could select any or all of the pieces and put them into a furnace, which would attempt to smelt them down into control rods. However control rods have to be made of a single pure metal of precise mass, so if the combined scrap metal didn't contain an exact amount of a certain metal, the attempt would fail. 
The twenty scrap images were randomly assigned and had no bearing on the mass or composition of the piece of scrap, nor of whether it would be useful in creating a control rod successfully. There were ten types of metal, and each type would create a control rod if the combined amount of metal in the chosen scrap was equal to a precise amount:
So for example, to make a rod of Slothite, you would need to choose scrap metal pieces whose combined amount of Slothite was 1.1 kg. For each scrap piece provided to the player, the mass and percentage composition was provided, so that players would have to calculate how much of each metal was present. In every selection of 10 pieces of scrap provided, there was always at least one valid combination that would provide a control rod, and these combinations always contained exactly three pieces, with the critical metal split between them. The other 7 pieces were randomly created, but sometimes by chance they would also allow for combinations that would cause valid rods to be created. Lastly, no more than 10 kg of material would fit into the furnace; attempting to put more than 10 kg in would result in a temporary meltdown (and the wrath of Yurbot). Making Acid When trying to make acid, the players would be provided with a certain quantity of one of the metals found in the "Making Control Rods" step. The metal was provided in the shape of a cylinder, and Yurbot would provide the length, radius, and density of the cylinder, and then ask how long the metal should be submerged in a "dissolution solution" (yeah, I don't know what that is either, and I wrote it) in order to cause it to turn into a useable quantity of acid. The trick was that each type of metal had its own formula for calculating this number. All of the formulas were based on the mass of the cylinder. In order to calculate the mass of a cylinder, you need the volume and density; Yurbot had already provided the density, so the player just needed to calculate the volume. The volume of a cylinder is calculated as follows: V = π * radius2 * height Each cylinder would have a random radius between 100 and 200 mm, and a random length between 300 and 500 mm, giving minimum and maximum volumes of 9,424,777.8 mm3 (9,424.7778 cm3) and 62,831,852 mm3 (62,831.852 cm3), respectively. Each type of metal had a constant density given in grams per cubic centimeter (g/cm3). Multiplying the volume by the density gave the overall mass of the cylinder. The mass was then plugged into a formula in order to give the correct number of seconds to soak the metal. The mass was then divided by 1,000,000 and fed into a formula as follows:
If the number of seconds entered was between 99% and 101% of the correct value, then the acid was successfully created. Fetching Black Holes This part was just a bit of a goof; players were provided with a "black hole farm": 
Clicking anywhere on the image would randomly decide a result. 20% of the time the player would successfully retrieve a black hole; 30% of the time the player would get crushed by tidal forces and have a 3-minute time out; and 50% of the time the player would get sucked through a wormhole and end up somewhere random in Neopia. Testing Stations Each of the 652-million-plus testing stations had to proceed through three phases in order to be marked as complete. First, the Heat Test, then the Dissolving Test, and then the Gravitics Test. Once one of the three phases was completed, that station would never have to complete that particular phase again, even if all the players present at that station left. Heat Test The first test at each station was a heat test. This was performed by exposing the duplicate Space Faerie Token (DSFT) to a plasma field. However, the automatic safety features of the reactors were missing, and so players had to manually move the control rods in order to keep the plasma properly contained. Once a rod was positioned correctly, it had to be locked by way of the lock icon near the control rod. 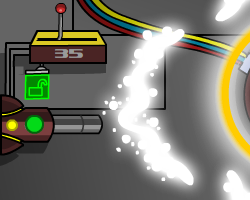
The control rod's position was controlled by a sliding lever, which had a number on it that would scale from 1 to 100 as the slider moved from left to right. The plasma arc was also positioned according to a sliding scale from 1 to 100, however its position did not change by the same amount per unit as the slider. As a result, when the plasma's position was farther from the center, the rod had to be relatively farther to the left, and when the plasma was closer to the center, the rod had to be relatively farther to the right. For example, in the above image, the plasma's exact position value is 35, and when the rod is placed at 35, its right edge is vertically aligned with the left edge of the leftmost tiny little plasma dot. However, in the following image, the plasma's exact position value is 90, and when the rod is placed at 90, its right edge is further to the right relative to that tiny plasma dot. 
There was a margin of error of +/- 10 units, but this dissimilar scaling meant that it was a bit trickier than simply lining the control rod up to the same place. :) If all four players in the testing station positioned their control rods correctly for three rounds in a row, the station would proceed to the Dissolving Test. Otherwise, all three rounds would have to be repeated if anyone failed at any point. Dissolving Test In this phase, the testing station required each player to add a certain amount of a certain kind of acid to a beaker containing the DSFT. Each player was told the total quantity of acid that all four players had to contribute; the kind of acid that they had to individually contribute; and the percentage of the whole that their acid should comprise. For example, a player might be told that the total quantity was 3.7 liters, and that their part was to be 29% perneopic acid. The interface allowed each player to enter a number of milliliters of acid, and to select (from a panel of 10 icons) the correct type of acid. However, the acids were helpfully unlabeled, so the players had to learn them either by trial and error, or by keeping track of what icon had been displayed when they had successfully created acid (see the "Making Acid" step, above). Calculating the number of milliliters of acid was fairly simple: Take the number of liters (e.g. 3.7), multiply it by 1000 (to get the number of milliliters, in this case 3700), and then multiply that by the player's percentage (in this case, 29%). 3700 * 0.29 = 1073. The acid icons matched the names as follows:
If all four players selected the correct acid and entered the correct number of milliliters for three rounds in a row, the testing station would proceed to the Gravitics Test. Gravitics Test The final testing phase involved placing singularities onto a grid in order to expose the DSFT to extreme gravitic forces. Each player was assigned a random secret location on the grid, and in each round was given a singularity to place. At the end of the round, a number would appear next to the singularity, indicating the distance (in pixels) to the secret location, but not the direction. Players had to triangulate upon the correct location by placing singularities in the first two rounds, and calculating the correct location from the number revealed in those rounds. Unlike the first two tests, in the Gravitics test the first two rounds would always succeed as long as everyone placed their singularities. Only the third round could fail, if at least one player failed to place their singularity correctly. The simplest way to calculate the correct location was to place the first two singularities at the top left and bottom left corners, and then plug the resulting numbers into the following formula: X = (D12 - D22 + 4002 / 800)...where D1 is the first distance, and D2 is the second distance. Conceptually, if you have a coordinate and a distance value, that defines a circle: 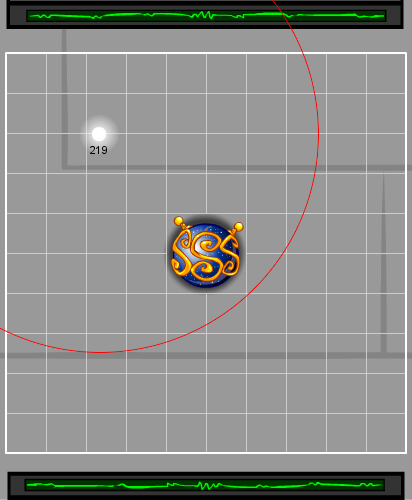
In the above image, the target point could be anywhere on that red circle. The first placement gives you one such circle, and the second placement gives you another such circle: 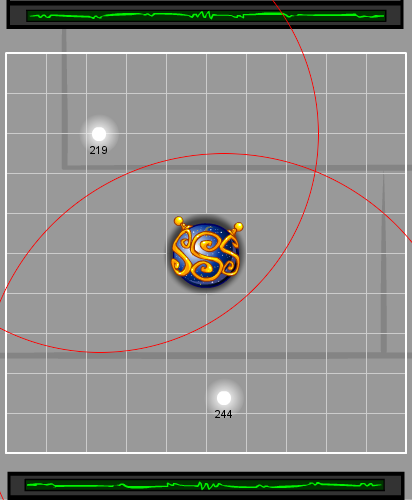
However, notice that in this case the circles would intersect at two different points. Since only one of them can be the target, placing the initial singularities in this way could make it more difficult. (Luckily, in this example, the circles only intersect once inside the field, but if the bottom circle had been slightly smaller, or slightly to the right, both intersection points would be inside the field.) The way to guarantee that the circles only intersect at one point (or rather, that only one of their intersection points is inside the grid) was to place the first two singularities at adjacent corners. (Any two adjacent corners would work, although the formula would have to change slightly.) The formulas above let players calculate the intersection points between the circles. In this test, if all four players placed their singularities correctly in the third round, the test would succeed and the testing station would become complete. |
||||||||||||||||||||||||||||||||||||||||||||||||||||||||||||||||||||||||||||||||||||||||||||||||||||||||||||||||||||
| Login to Neopets! | |||
|
|||


|
|||||||

You've clicked on a link that will take you outside of
It is a journey
I must face...alone. *dramatic music*
I want to stay on Neopets,
where the dangers of Meepit invasion are taken seriously.
You've clicked on a link that will take you outside of
It is a journey
I must face...alone. *dramatic music*
I want to stay on Neopets,
where the dangers of Meepit invasion are taken seriously.
You've clicked on a link that will take you outside of
It is a journey
I must face...alone. *dramatic music*
I want to stay on Neopets,
where the dangers of Meepit invasion are taken seriously. 
NEOPETS and all related indicia are trademarks of Neopets, Inc., © 1999-2024. ® denotes Reg. USPTO. All rights reserved. Use of this site signifies your acceptance of the Terms of Use. Your California Privacy Rights
|
|||||||