Neopets - How to draw a Tasu

How to draw a Tasu : Printable Version

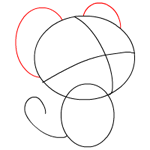
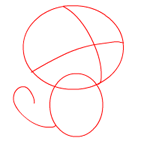
Start by drawing a large, slightly flattened circle for the Tasu's head. Lightly sketch a pair of crossed lines on the circle, which will help you place the Tasu's facial features later on. Next, make an oval that overlaps the head shape a bit for the Tasu's body. Finally, draw a curved line that connects to the bottom of the Tasu's body. This will become its tail.

Now, make two curved lines on top of the Tasu's head for its ears.

It's now time to begin drawing the Tasu's legs and paws. Make four small ovals for the Tasu's paws. One of its front paws is raised, so draw it a little higher than the others. Then, connect the paw shapes to the body shape with some lines.

Finish drawing the Tasu's legs and paws by filling out the legs and dividing each paw into three separate toes.

Next, complete the Tasu's tail by giving it some more shape. Then, add a bit of definition to its head shape, as well as some furry texture on its cheeks.

Let's begin working on the Tasu's face. Using the guide lines you made in the first step, draw two ovals for the Tasu's eyes, plus a smaller oval for its nose. Finally, give your Tasu a smiling mouth.

The Tasu's ears could use some more shape and detail. Don't forget to add a bit of fur to them, too! Lastly, draw the Tasu's whiskers.

Erase any extra lines you might have on your drawing. Then, give your Tasu a pair of small teeth that peek out of its mouth and add tiny claws to its paws.

Your drawing should now look like this.

It's time to give your picture some colour using anything you'd like, from markers to paints. If you'd like, you can even make your Tasu speckled, like this one!

Add a few finishing touches to your drawing by giving it lots of shading, which will make it look especially realistic.