How to draw an Eyrie : Printable Version

Start by drawing three overlapping circles. The middle one should be larger than the other two as this will be your Eyrie's body. Then divide each circle into section, like so.

Underneath the body, draw on your Eyrie's legs.

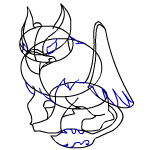
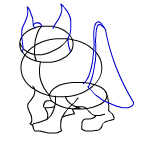
Now add the distinctive ear tufts by drawing two triangular shapes, one on either side of the head. Behind the left ear draw a small semi-circle. Give your face a little more shape by drawing two curved lines through it. Next draw on your Eyrie's wing.

Draw your Eyrie's beak first. From the top of the beak, draw a curved line that extends up to the tip of each ear. Lastly, add your Eyrie's tail.

In this step you will give your Eyrie's body a little more detail. Begin by drawing two almond shaped eyes. Then draw your Eyrie's chest. Make the lines quite jagged to give a downy appearance. At the bottom of your wing draw some curved lines for the feather tips. Then give your Eyrie's tail tip a little more shape but adding a few curved lines.

Clean up your drawing by erasing all the extra lines. You should be left with something similar to this.

Add a few finishing touches like toes in your paws and jagged lines around your Eyrie's ears and cheeks. Don't forget to draw a small line through each eye for the pupil.

Erase all the extra lines and your Eyrie drawing is complete.

Give your Eyrie a more proffessional look by adding some colour and shading.