Tuskaninny
At last, the chance to draw your very own Tuskaninny has arrived! This
little chap is quite easy to sketch once you know how.
Click here for a printable version.
|

|
|
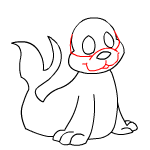
It's time to add a little detail. Draw a line all the way across
the face (so that it cuts through the top of the flat oval shape). Next,
draw another curve (an upside down smile shape) that cuts through the
line you just drew. You have now drawn its nose. Lastly, make two wide
"U" shapes that meet under your Tuskaninny's nose to form its mouth.
|

|

|
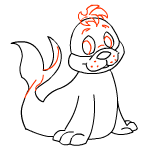
After making sure that you don't have any extra lines, add some more
detail to your drawing. First, place a small circle inside each eye for
the pupils. Then, add some short curved lines over your Tuskaninny's
eyes (for its eyebrows) and another short curved line just above its
nose. Make some dots on the Tuskaninny's snout for its whiskers, and
give its tail more detail. Finally, add a tuft of hair and your
Tuskaninny is complete!
|
|
Once you have finished sketching your Tuskaninny, you can add some
colour and shading. This will make your picture look much more
life-like.
|

|
|


