How to draw a Moehog : Printable Version
|
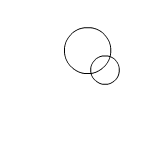
Begin by drawing two overlapping circles.
|
|
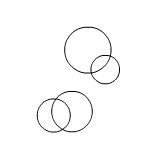
Then draw two more overlapping circles below and to the left of your first two.
|
|

|
Now join your two sets of circles together with two lines. This will be your Moehog's neck.
Add three legs underneath your lower circles. Moehogs do have four legs, but you can only see
three in this pose. Lastly draw a little triangle for your Moehog's tail.
|
|
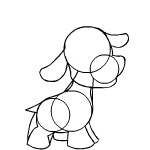
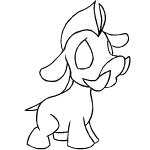
Draw two ears, one on either side or your Moehog's head. Then go around your Moehog's outline
giving it a little more shape. The easiest way for you to do this is to try and copy this picture
as closely as possible.
|
|
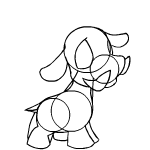
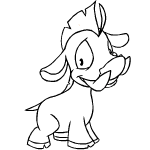
In this step you will add your Moehog's eyes and tusks. You can only really see one eye properly, so
draw one almond shaped eye on the left side of your Moehog's head. On the right side draw a small
semi-circular shape for the other eye. Then draw two tusks, one on either side of your Moehog's nose.
|
|
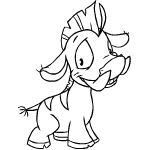
Erase all your extra lines so you are left with a clear outline of a Moehog. Then add a few bits of detail
such as a line across your Moehog's muzzle and hair on the top of the head. Don't forget the hair should extend
along the back also.
|
|
|
Draw a small circle inside your Moehog's eye, this will be the pupil. Give the mouth and muzzle
a little more detail and add nostrils. At the base of each leg draw a hoof shape. Draw a curved
line inside each ear to give the ear more shape. Lastly draw a few more lines in your Moehog's
hair to give it a more hair-like appearance.
|
|
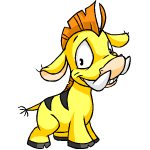
Inside each ear draw a few tufts of hair. Add a line underneath the eye, this will be a small bag.
Draw on teeth and add two small dots, one inside each nostril. Finish off your Moehog's tail with a
few extra hairs at the end. Draw two stripes down your Moehog's side and draw lots of small lines along your Moehog's
mane. Your drawing is now complete!
|
|
|
To really finish off your Moehog picture, add some colour and shading.
|


